For a number of years we have been thinking and planning and designing (yes some would say that I over design "stuff") a renovation to our house that would refresh and make a larger space out of our small little bungalow.
Interesting how it is so much like a boat where you are working in a relatively small space and maximizing it as best we can. Here is our story with a few pictures (as you have noticed we do more of a picture story that a worded story).
In the Beginning .... start date of about June ... with a few intermissions in between ... we work on this from June to July, then take a three week "time away" then back at it from August to September when we take a 5 week time away ... (renovation is so stressful) ... and so all it all we working on this project for about 15 weeks ... so far.
So here is our story ...
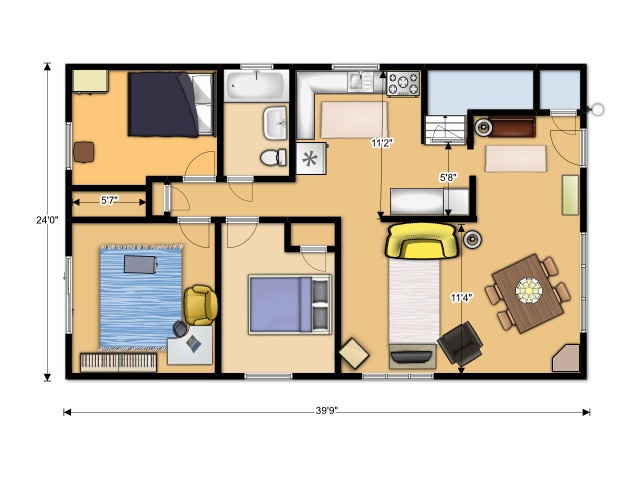
To this ... with two French Doors to the back deck. Making the upper left bedroom our Guest Room with a walk around Queen Bed and a Master Room with a private bathroom. Both rooms will have French Door style patio doors out to the back deck and garden.
We started with the smaller part of the renovation that we called Phase 1. That is the small bedroom in the upper left hand corner of the plan view above. Basically this Phase 1 involved tearing out the inside finishings, floor and ceiling to be studded, spray foam insulated (there is no insulation in the walls of our house) and gluing and screwing to the floor joists a new 3/4" plywood sub-floor (as the old one was very squeeky). Here are some pictures from that Phase 1 renovation works;
Mostly cleaned out room before walls are stripped out ...
Walls are gone and still need to remove the old closet wall (to the left side of the picture) ...
Sub-floor replacement ... can see right down tot he basement ... don't step there BOB!
Wall are studded and before the Spray Foam was installed ... fiberglass batts hanging around to stuff in holes to try and diminish over spray from the foam gun ...
Gyprock and ready for door ... you can see some of the purple colored over spray from the foam insulation around the door.
Door installed ... in the fore ground, baseboard getting a few coats of paint on the back deck.

Nora chose the color scheme ... needless to say it is bright and bold ...

The room is livable ... so now can start Phase II ... will install the new hardwood floor all at once for Phase 1 and II.
Starting the removal on Phase II;


Inspector(s) checking things out ...
The almost cleaned out room ... still have to remove the plaster on the end wall ...

Taking up the old Sub-Floor ... squeeks too much and wanted to match the floor heights with the remaining floors in the house ... so took out the old and replaced with 3/4 plywood like Phase I.
The admiral at work ...
With all the materials taken out of Phase II we filled this 14 yd bin ...

The rough layout, shown with blue tape, of the bathroom and closet beside it.

Purple Spray Foam ... this was a picture of the first pass of the contractor ... had them back to fill each cavity between the studs. Ended up great and will be much warmer in the winter and cooler in the summer on this North facing wall.

Presto ... its drywalled ... ;-)

reinforced backing plywood for mounting vanity that will hang off the wall ...

reinforced backing plywood for mounting the toilet roll holder ... priorities!
Thats all the pics we have now ... we paint the walls this weekend and so will have more pics coming soon ...